It sounds worse than it is because in reality, we've been bathing in the bathtub since our master bathroom renovation kicked off around the middle of March. I can't tell you how excited I am to use our new shower. The only reason I'm not in there now is because I'm waiting for the tile and grout to hard cure.
Let's recap shall we....
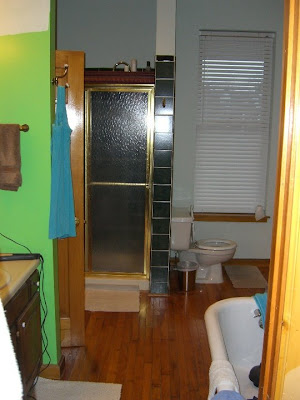
Bathroom Before - I had actually painted part of the bathroom a very pale green and hung 2" white blinds to help make the bathroom more "liveable" while we figured out what we wanted to do and to save for the renovations. The lime green on wall next to the vanity was the previous owner's color of choice for the bathroom.

Renovations begin - we removed that half wall next to the vanity and extended the shower wall out by about 8 inches. We removed the hardwood floors which were not original to the house and served of no historical value. Under the 198o's hardwoods, we found the original hardwoods, but opted not to salvage them. You can see the plywood starting to go down to act as an additional subfloor for the travertine.

Framing out of the shower. We decided to do a corner bench to store product and to also serve as a place to sit or prop a leg up on while shaving in the shower. Projects that you don't see include the installation of 1/2" hardibacker on the shower walls, pouring of the mud shower pan, and the additional plumbing for a second shower head.

And the finished product!!! We installed 12" by 18" travertine tiles in a brick pattern along the walls with an accent tile at about eye level. Around the perimeter, we installed a bullnose travertine border. The floor is made up of 2" square tiles and the bench and shower curb use 1" tiles. We are using Delta fixtues in a bronze finish. Only one of the shower heads has been installed at this point as we are waiting for the cover to go over the diverter value that will allow us to use the second shower head. We ordered (and have sitting in the basement) the handheld shower head that will go on the other side. It has a bar that mounts to the tile which will allow you to position the shower head at a variety of heights.

Close up of the accent tile.

Shower bench and shower floor and a preview of the floor. We are using an offset pinwheel pattern which incorporates 18" square tile as well as 6" square tile. We have a frameless shower door on order so we'll be using a shower curtain for the time being.

And in other news, remember this scene from a few months ago...

Well, I spent an entire weekend back in April trimming everything back and installing about 300 square feet of weed fabric. Two yards of mulch and a flat of annuals later and things are starting to shape up!


Oh and if you need to get a hold of me and I don't seem to be answering my phone, I'm in the shower!!!

8 comments:
Wow, Christie. That is absolutely amazing. You've been hard at work and it looks fab.
Beautiful, Christie! I wish I had your eye for design! :-) The shower is amazing, and the landscaping looks so nice!
Christie, it looks phenomenal! (And I must say, the lack of lime green is a welcome change.)
It looks amazing Christie! I'm always awed by your handiwork. Enjoy the showers!
Christy, it looks GREAT! Can't wait to see it in person.
You've progressed really quickly on the shower since the GNO! It looks so good-I love the small tile details. Your home improvement skills amaze me. You used words I've never even heard before! Enjoy your shower!
Christie it looks great! I'm not really on StlWed board anymore but I definitely have your blog on my google reader!
Your bathroom is similar to what we were wanting to do with our bathroom but we don't have enough square footage to do that floor pattern. Do you think mixing the subway pattern in the shower with a diagonal on the floor would look weird?
Also, I wanted to see if you have a recommendation for a good carpenter. We need one to come out and fix the swayback in our garage roof, oy!
That place looks beautiful!!
Post a Comment